الأربعاء، 20 مايو 2020

Hacking PayPal's Express Checkout


Do you know what is happening in the background when you buy something in an online shop using PayPal?

In this post we will tackle the following problems:
  • How can PayPal's API be tested?
  • How does PayPal's Express Checkout work? You can find the detailed report here.
  • How can we debit more money than authorized?

How PayPal's API can be tested?

PayPal's Sandbox API

PayPal offers a feature called PayPal Sandbox Accounts, which mimics the production API. The basic idea is that a normal user/shop can test the API and make transactions without actually transferring money. This is the perfect tool for developers to test their API integration.

Access to all messages

The next question is how to get access to all messages. All browser-related messages can be inspected, intercepted, and modified via BurpSuite. The main problem here is how to get access to the server-to-server exchanged messages: the messages exchanged between PayPal and a shop. In order to solve this problem, we deployed our own shop. For this purpose we used Magento, which already has a PayPal integration.
Once we have our own controlled shop, we can enforce Magento to send all request through a proxy.
In the following picture you can see our setup.

Test suite for analyzing PayPal's API [1]

In order to capture the traffic between our Magento hhop and PayPal we proceeded as follows:
  • We configured Magento to use a proxy running on localhost:8081.
  • We connected the proxy port on the virtual machine with our local machine via SSH remote port forwarding by issuing the following command
    ssh -N -R 8081: localhost :8081 <IP of Magento shop>
  • We configured BurpSuite running on our local machine to listen on Port 8081 for incoming requests.
Now, we were able to see the entire traffic.
Please note that we uses our own, custom Magento shop in order to be able to test Paypal's API.

PayPal's Express Checkout

An overview of the checkout procedure is depicted in the following:
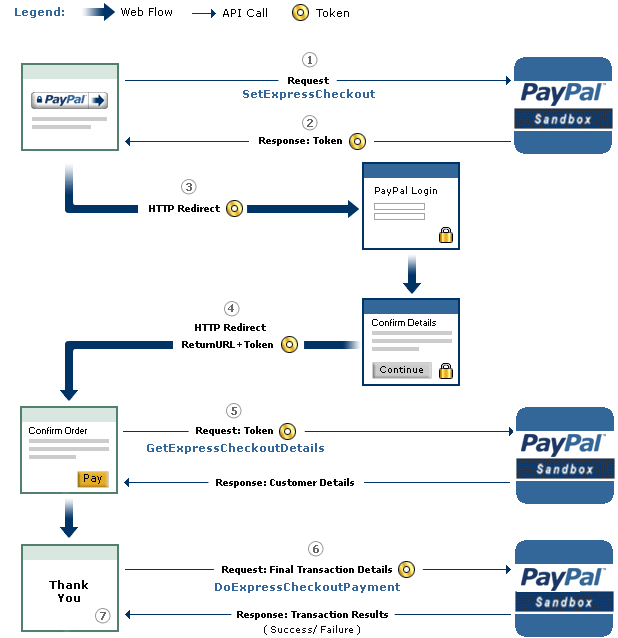
PayPal's Express Checkout [2]


Step 1: Magento tells the PayPal API where to redirect the user after authorizing the transaction via the parameter RETURNURL and requests a token for this transaction.
Step 2: The PayPal API provides Magento with the token.
Step 3: Magento redirects the user to PayPal's website. The redirect contains the token from the previous step.
Step 4:  The user authorizes the transaction. As a result, he will be redirected back to Magento (RETURNURL) with the token.
Step 5: Magento issues a request to the PayPal API to get the transaction details.

Step 6: Magento signals the PayPal API to execute the transaction.

Step 7: Magento serves the success page.

A more detailed view of the protocol and all parameters is shown on page 16 in the full version. We will concentrate only on step 6 and the parameters relevant for the attack.

The Attack

The goal of the attack is to let a shop (in our case Magento) debit more money than authorized by the PayPal user. The core of the attack is Step 6 -- DoExpressCheckoutPayment. Let's get a deeper look at this message:

Magento can raise the authorized amount and debit more money from the user's account

  • The shop sends the token, which was issued in the first step of the protocol and identifies uniquely the transaction through all steps. 
  • The PayerID referring to the user that authorized the payment.
  • The AMT defining the amount, which will be transferred.
  • The API Credentials authenticating Magento on PayPal.
  • The Version pointing to the release number of the API.

As one can imagine, the core problem we found was the change of the AMT parameter. This value can be freely chosen by the shop, despite the fact that the user has authorized a different amount.

We tested only the SandBox API, but refused to test the production API in order to avoid problems. We promptly contacted PayPal's security team and described the problem hoping that PayPal can and will test the production API against the attack.

The response of PayPal can be summarized as follows:
  • We don't get any BugBounty since we only tested the Sanbox API. (Fair enough)
  • In the Production API PayPal this flexibility is a wanted feature. Thus, PayPal allows a merchant to charge for shipping and/or other expenses different amounts. Any malicious behavior can be detected by PayPal. In case of fraudulent charges the consumer are protected by the Buyer Protection policy.
... but the Sandbox API was nevertheless fixed.

Authors of this Post

Daniel Hirschberger
Vladislav Mladenov
Christian Mainka (@CheariX)


[1] BurpSuite Logo
[2] PayPal Express Checkout
Related posts

$$$ Bug Bounty $$$

What is Bug Bounty ?


A bug bounty program, also called a vulnerability rewards program (VRP), is a crowdsourcing initiative that rewards individuals for discovering and reporting software bugs. Bug bounty programs are often initiated to supplement internal code audits and penetration tests as part of an organization's vulnerability management strategy.


Many software vendors and websites run bug bounty programs, paying out cash rewards to software security researchers and white hat hackers who report software vulnerabilities that have the potential to be exploited. Bug reports must document enough information for for the organization offering the bounty to be able to reproduce the vulnerability. Typically, payment amounts are commensurate with the size of the organization, the difficulty in hacking the system and how much impact on users a bug might have.


Mozilla paid out a $3,000 flat rate bounty for bugs that fit its criteria, while Facebook has given out as much as $20,000 for a single bug report. Google paid Chrome operating system bug reporters a combined $700,000 in 2012 and Microsoft paid UK researcher James Forshaw $100,000 for an attack vulnerability in Windows 8.1.  In 2016, Apple announced rewards that max out at $200,000 for a flaw in the iOS secure boot firmware components and up to $50,000 for execution of arbitrary code with kernel privileges or unauthorized iCloud access.


While the use of ethical hackers to find bugs can be very effective, such programs can also be controversial. To limit potential risk, some organizations are offering closed bug bounty programs that require an invitation. Apple, for example, has limited bug bounty participation to few dozen researchers.
More articles

Removing Windows OS Passwords With CHNTPW On Kali Linux


After Some Requests, I made this tutorial on How to Remove Windows Passwords
So First of all lets' see which tool we are going to use

[UPDATE] If you are having any kinda problem with this method on windows 8/8.1 then try this method
If you want to recover Windows 8/8.1 passwords instead of removing them see this tutorial
Tool Name:- chntpw
Tool Description: Obviously its' going to be what the man page of tool says: "chntpw is a utility to view some information and change user passwords in a Windows NT/2000 SAM userdatabase file,  usually  located  at  \WINDOWS\system32\config\SAM on the  Windows file system. It is not necessary to know the old passwords to reset them.  In addition it contains a simple registry editor  (same  size  data writes) and hex-editor with which the information contained in a registry file can be browsed and modified."

Attack Requirements:
1. Physical Access to victims Computer.
2. A live bootable pendrive of Kali Linux.

    (Download Kali Linux)

So Lets' get started:
Step 1: Mounting the drive containing Windows OS-> This one is easy ain't it? Well so that you might not have forgotten how to do it, I'll type the syntax:
ntfs-3g /dev/sda1 /media/win
Note that 'sda1' in above command is the partition on which Windows OS is installed yours can be different. To check yours simply type fdisk -l which will list your all partitions and then check by yourself on which partition your Windows OS is installed. If you can't get it this way then don't worry I'm still here well then you can try doing it in 'GUI' way. Click on Applications > Accessories > Disk Utility then select victims' hard disk and see on which partition Windows OS is installed. If Windows Partition is installed on any other partition then replace 'sda1' in the above command with that which you found e,g 'sda2''. Also note that if there is no such directory as 'win' (mentioned in above command) in your /media folder then you must create one which is simple just type mkdir /media/win this command will make win folder in media folder on which you'll mount victim's Windows OS (It is not necessary that it's name be 'win' you can use any name).
Step 2: OK after successfully mounting Victim's Windows OS now you need to move there but wait not only there instead very much deep in there. You need to move to config folder which is located in System32 folder (Note that it is Capital 'S' in windows 7 & 8). You can move there using this command:-
cd /media/win/Windows/System32/config/ (On Windows 7 & 8)
or
cd /media/win/WINDOWS/system32/config/ (On Windows XP and those before it)
Step 3: Now is the most tough part of game (only if tough means easy :) ). Now as when you are inside the config directory type the following command to see the list of users available on Victim's Machine:
chntpw -l SAM (remember it is ell not 1)

note the name of user whose password you want to clear.
Step 4: Oh man our happy journey is coming to an end now. Follow the upcoming steps to blast Victim's Windows OS password:
type the command:
chntpw -u <username> SAM

Note: <username> here is the name of user you noted in the above step.
it will display different options before you.
type 1 and hit enter
type y and hit enter


Voola you busted Victim's password now turn off Kali and Open Victim's Windows OS without knowing His/Her Password. Bad Bad Bad...

For More Info on chntpw type this in your terminal:
man chntpw
This will display Manual Page of chntpw...

Happy Cracking... :)
Don't forget to read the Disclaimer

Read more


  1. Diferencia Entre Hacker Y Cracker
  2. Hacking Ethical
  3. Aprender A Hackear Desde Cero
  4. Hacking Netflix Account
  5. Wifi Hacking
  6. Tutorial Hacking
  7. Hacker Significado
  8. Programa Hacker
  9. Wifi Hacking
  10. Hacking Significado
  11. Curso Seguridad Informatica
  12. Ethical Hacking Course

HTML5 Games On Android

On my last hollidays, I made two HTML5 games, and published on android market. Nowadays javascript has powerful libraries for doing almost everything, and also there are several compilers from java or c code to javascript, converting opengl c code to html5 canvas, but definitely, javascript execution is slower than dalvik applications, and of course much slower than arm c libs. For improving the speed of sounds and images loader, I have used javascript asynchronous execution and scheduling priority has been controlled with setTimeout/setInterval which deprioritize or priorize a code block. This games are published on the android market here: Android Planets and here: Far Planet Related links
  1. Mindset Hacking Nacho
  2. Hacker Definicion Informatica
  3. Hacking Wikipedia
  4. Hacking Code
  5. Hackers Informaticos Contactar
  6. Hacking System
  7. Ingeniería Social El Arte Del Hacking Personal

الثلاثاء، 19 مايو 2020

Linux Command Line Hackery Series - Part 6


Welcome back to Linux Command Line Hackery series, I hope you've enjoyed this series so far and would have learned something (at least a bit). Today we're going to get into user management, that is we are going to learn commands that will help us add and remove users and groups. So bring it on...

Before we get into adding new users to our system lets first talk about a command that will be useful if you are a non-root user.

Command: sudo
Syntax: sudo [options] command
Description: sudo allows a permitted user to execute a command as a superuser or another user.

Since the commands to follow need root privileges, if you are not root then don't forget to prefix these commands with sudo command. And yes you'll need to enter the root password in order to execute any command with sudo as root.

Command: useradd
Syntax: useradd [options] username
Description: this command is used for creating new user but is kinda old school.
Lets try to add a new user to our box.
[Note: I'm performing these commands as root user, you'll need root privileges to add a new user to your box. If you aren't root then you can try these commands by prefixing the sudo command at the very beginning of these command like this sudo useradd joe. You'll be prompted for your root password, enter it and you're good to go]

useradd joe

To verify that this command has really added a user to our box we can look at three files that store a users data on a Linux box, which are:

/etc/passwd -> this file stores information about a user separated by colons in this manner, first is login name, then in past there used to be an encrypted password hash at the second place however since the password hashes were moved to shadow file now it has a cross (x) there, then there is user id, after it is the user's group id, following it is a comment field, then the next field contains users home directory, and at last is the login shell of the user.

/etc/group  -> this file stores information about groups, that is id of the group and to which group an user belongs.

/etc/shadow -> this file stores the encrypted password of users.

Using our command line techniques we learned so far lets check out these files and verify if our user has been created:

cat /etc/passwd /etc/group /etc/shadow | grep joe


In the above screenshot you can notice an ! in the /etc/shadow, this means the password of this user has not been set yet. That means we have to set the password of user joe manually, lets do just that.

Command: passwd
Syntax: passwd [options] [username]
Description: this command is used to change the password of user accounts.
Note that this command needs root privileges. So if you are not root then prefix this command with sudo.

passwd joe


After typing this command, you'll be prompted password and then for verifying your password. The password won't show up on the terminal.
Now joe's account is up and running with a password.

The useradd command is a old school command, lets create a new user with a different command which is kinda interactive.

Command: adduser
Syntax: adduser [options] user
Description: adduser command adds a user to the system. It is more friendly front-end to the useradd command.

So lets create a new user with adduser.

adduser jane


as seen in the image it prompts for password, full name and many other things and thus is easy to use.

OK now we know how to create a user its time to create a group which is very easy.

Command: addgroup
Syntax: addgroup [options] groupname
Description: This command is used to create a new group or add an existing user to an existing group.

We create a new group like this

addgroup grownups


So now we have a group called grownups, you can verify it by looking at /etc/group file.
Since joe is not a grownup user yet but jane is we'll add jane to grownups group like this:

addgroup jane grownups


Now jane is the member of grownups.

Its time to learn how to remove a user from our system and how to remove a group from the system, lets get straight to that.

Command: deluser
Syntax: deluser [options] username
Description: remove a user from system.

Lets remove joe from our system

deluser joe

Yes its as easy as that. But remember by default deluser will remove the user without removing the home directory or any other files owned by the user. Removing the home directory can be achieved by using the --remove-home option.

deluser jane --remove-home

Also the --remove-all-files option removes all the files from the system owned by the user (better watch-out). And to create a backup of all the files before deleting use the --backup option.

We don't need grownups group so lets remove it.

Command: delgroup
Syntax: delgroup [options] groupname
Description: remove a group from the system.

To remove grownups group just type:

delgroup grownups


That's it for today hope you got something in your head.

Related links


  1. Aprender Seguridad Informatica
  2. Machine Learning Hacking
  3. Hacking Etico Curso Gratis
  4. Que Estudiar Para Ser Hacker

DiscordRAT - Discord Remote Administration Tool Fully Written In Python


Discord Remote Administration Tool fully written in Python3.
This is a RAT controlled over Discord with over 20 post exploitation modules.

Disclaimer:
This tool is for educational use only, the author will not be held responsible for any misuse of this tool.
This is my first project on github as such this project is far from perfect , I will listen to any criticism as long as it is constructive.

Setup Guide:
You will first need to register a bot with the Discord developper portal and then add the bot to the server that you want. Once the bot is created copy the token of your bot and paste it at line 11.
Now on go on discord , go to the settings , go to appearance , scroll to the bottom , and activate "Developer Mode",now go to the server where your bot added right click on the channel where you want the bot to post , click copy ID and finally , paste the ID in the parenthesis in line 99.
Install requirements ("pip3 install -r requirements.txt")
Then if steps above were succesful after launching the python file, or executable , it will post a message on the server with a generated uuid , all that is left to do is posting "!interact " with the given uuid.
Now your bot should be available to use !
Requirements:
Python3,Windows
Compiling to exe (optional):
If you want to compile the bot to exe you can use PyInstaller.
Inside the directory of the bot execute "PyInstaller --onefile --noconsole DiscordRAT.py" or "python3 -m PyInstaller --onefile --noconsole DiscordRAT(NoCV).py (or DiscordRAT.py)"
If an error occured during compiling try to import the discord module "PyInstaller --onefile --noconsole --hidden-import=discord DiscordRAT.py"
Advice:
If you have problems with the installation of win32api or other modules , try installing it in a python virtual environment.
There are two python files one has opencv and webcam related modules the other does not, this has been done because open-cv adds multiple dozens of megabytes to the compiled .exe file.


via KitPloit
Continue reading

APPLE IPHONE X FACE ID CAN BE HACKED WITH SILICON MASK

Just a week after Apple released its brand new iPhone X on November 3, a team of researchers has claimed to successfully hack Apple's Face ID facial recognition technology with a mask that costs less than $150. They said Apple iPhone x face id can be hacked with silicon mask easily.

apple iPhone x face id hacked
Yes, Apple's "ultra-secure" Face ID security for the iPhone X is not as secure as the company claimed during its launch event in September this year.

"Apple engineering teams have even gone and worked with professional mask makers and makeup artists in Hollywood to protect against these attempts to beat Face ID," Apple's senior VP of worldwide marketing Phil Schiller said about Face ID system during the event.

"These are actual masks used by the engineering team to train the neural network to protect against them in Face ID."

However, the bad news is that researchers from Vietnamese cybersecurity firm Bkav were able to unlock the iPhone X using a mask.

Yes, Bkav researchers have a better option than holding it up to your face while you sleep. Bkav researchers re-created the owner's face through a combination of 3D printed mask, makeup, and 2D images with some "special processing done on the cheeks and around the face, where there are large skin areas" and the nose is created from silicone.

The researchers have also published a proof-of-concept video, showing the brand-new iPhone X first being unlocked using the specially constructed mask, and then using the Bkav researcher's face, in just one go.

"Many people in the world have tried different kinds of masks but all failed. It is because we understand how AI of Face ID works and how to bypass it," an FAQ on the Bkav website said.

"You can try it out with your own iPhone X, the phone shall recognize you even when you cover a half of your face. It means the recognition mechanism is not as strict as you think, Apple seems to rely too much on Face ID's AI. We just need a half face to create the mask. It was even simpler than we ourselves had thought."

Researchers explain that their "proof-of-concept" demo took about five days after they got iPhone X on November 5th. They also said the demo was performed against one of their team member's face without training iPhone X to recognize any components of the mask.

"We used a popular 3D printer. The nose was made by a handmade artist. We use 2D printing for other parts (similar to how we tricked Face Recognition 9 years ago). The skin was also hand-made to trick Apple's AI," the firm said.

The security firm said it cost the company around $150 for parts (which did not include a 3D printer), though it did not specify how many attempts its researchers took them to bypass the security of Apple's Face ID.

It should be noted that creating such a mask to unlock someone's iPhone is a time-consuming process and it is not possible to hack into a random person's iPhone.

However, if you prefer privacy and security over convenience, we highly recommend you to use a passcode instead of fingerprint or Face ID to unlock your phone.
Related links